Showing posts with label cake. Show all posts

Monday, February 2, 2015

My wedding cake adventure

It seems like I have been abandoning this blog again and I'd like to apologize for that. I've been having this thing called laziness. It was hard for me to focus on both my food blog, and book review blog.

Anyway...

Last month, I was super busy with a friend's wedding. Since she's one of my closest friends (I've known her for 20+ years!) I told her that I wanted to make her a wedding cake (for practice purposes) and some decorated sugar cookies as the door gift.

Let's talk about the wedding cake first.

I sucked at cake decorating. And I have not much experience with fondant. I didn't even know how to cover a cake with fondant. So, I took a class on fondant cake decorating a few months ago. And it was super easy to cover a dummy cake. And with the help with the amazing instructor, I managed to make my fondant cake looked as amazing as the picture below. 


As you can see, the pretty roses was done by the instructor. I managed to make only one of them, and they didn't resemble rose very much. I need practice!

I was confident that I could perhaps make a cake that resemble something like this again. My friend (the bride) loves black, and gray. I thought that I could probably make a presentable cake. But this is what my cake looks like...


I know.

I'm so disappointed with what I did to my friend's wedding cake.

If you look closely (at the top tier), you will notice how I didn't have much skill with fondant or cake decorating. It was a good thing that I have those store bought gum paste roses. And it's a good thing that I was planning to make cupcakes and put them on a stand like the picture above. I'm not so sure if I can handle a 3 tier fondant cake. And people didn't really care about the cake on the top tier once they saw the mini cupcakes. Ha!

Oh! And those are chocolate cake with salted caramel buttercream.

Let's take a look at the sugar cookies I made for the door gift.


First, I have to draw the black section, and let it dry. Then, the white section. After the white section dried, I have to draw the lace with the white icing. It was a good thing that I got an amazing set of lace stencils from an art store. I was planning to buy some stencils from Wilton, but they are too expensive for me. When the white lace, dried, I have to paint them with AmeriColor' air brush gold color.


Frosting these cookies took so much time. But the bride requested some black and gold. And I decided not to frost them all with black as I was afraid that people might freak out with the color. I'm glad that I frosted them with a bit of ivory. They looked much nicer, sweeter.

I have a few extra sugar cookies and decided to make them into this:


The extras look pretty good. I googled a few pictures and decided to try them. Frost the black section, draw some flowers with white icing, dragged them with brushes for the texture, and painted them with gold. I really like this one!

Now I'm done with my wedding cake & sugar cookie adventure. I'm not sure if I'll be updating this blog as frequently. But will try my very best as I do have some photos of cakes I haven't shared, and recipes I haven't posted yet.

Until then...

Wednesday, October 2, 2013

Strawberry Cream Swiss Roll


I was really excited to try that decorated Swiss roll. With my first batch, the cake didn't turn out so great (I used a recipe I found on this new cookbook I bought). The design/decoration got mixed up with the batter that I have no idea what design it was on the cake. I made the second batch using a different recipes (this recipes was the one I got from my lecturer during my pastry class). The cake turned out good, but the design was 'meh'.That was why I decided to cover that not-so-attractive design with lots of whipping cream, and made myself some Strawberry Cream Swiss Roll.
Strawberry Cream Swiss Roll

45g soft flour
25g corn flour
3g baking powder
30g ovalette (a type of sponge cake stabilizer)
120g castor sugar
5nos eggs
20ml water
60g melted butter
1-2 tsp vanilla essence
whipping cream
strawberry - cut into small cubes
strawberry sauce
  1. Preheat oven to 180 degrees Celsius. Melt butter. Set aside.
  2. Add in all ingredients, except for butter into mixer. Beat well in about 5 minutes with wire whisk.
  3. Fold in butter into cake batter.
  4. You may take 1/4 batter and use it for design decoration on the Swiss roll
  5. Pour batter into sheet tray and bake for 15 to 20 minutes.
  6. Leave to cool.
  7. Spread whipping cream on cake and sprinkle some strawberry on top.
  8. Roll cake carefully.
  9. Pipe more whipping cream on top and garnish with strawberry. You may drizzle strawberry sauce on top.

I haven't been posting more recipes this recently. My excuse would be that I was busy. But the truth was that I was lazy to write/upload photos of food I made. Hmm...

Tuesday, June 18, 2013

Ombre Rosette Cake


I made this Ombre Rosette Cake for engagement gift. It was basically a vanilla cake layered and coated with Swiss Meringue Buttercream.


The inside was layered with four colored of vanilla cake. The top was plain yellow/white cake. Then each of the bottom layer will have a different red-ish color.


I sprinkled on some red sand sugar to give the cake more color on top. And this is how the final product looks like!

Tuesday, July 17, 2012

Pocky & m&m's Chocolate Cake


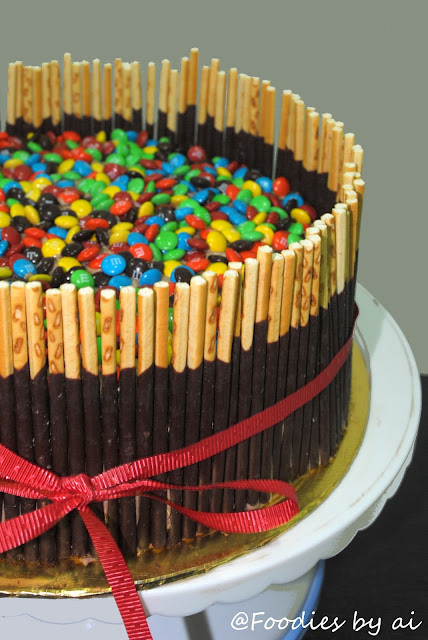
I made this for my cousin's daughter's birthday. It's chocolate cake frosted with chocolate Swiss meringue butter cream. The sides (or flaws) were lined with chocolate Pocky sticks and the top was sprinkled with mini m&m's. I think the kids will love this.

Although, admittedly, I wrongly read the recipes and had reduced the sugar to half. (^///^) 

Can you guess how many boxes of Pocky and tubes of mini m&m did I use for the cake?

Sunday, April 29, 2012

Apam Polka Dot, Plain


Remember the last time I post on Experimenting: Apam Polka Dot? Well, I'm back to experiment with them again this week. While weighing the ingredients, I couldn't help but to be reminded to sponge cake. There were some resemblance of ingredients between them. Could Apam Polka Dot be translated to Steamed Sponge Cup Cake? Nah... I think it's better to call it as Apam Polka Dot.


And making them was quite simple too! First, you prepare the batter and divide them into a few portion. Drop in a few drops of your preferred food coloring and mix them well.


Next, arrange mini paper cups into a plastic mold or small plastic cup (or anything as above). The last time I made this, I arranged them into a mini tarts mold. And it didn't look as pretty as using these small plastic mold. 


Then, add in the batter into a piping bag, and piped the batter into paper cup until it was 3/4 full. Or you could use a teaspoon. But using a piping bag is neater. Then, use another piping bag with different color of batter and pipe small dots on top of batter.


If you're feeling a bit adventurous, you may pipe any other design that you like. For example, flower.


Or cute and weird emoticons like these...


Or perhaps attempt to pipe them into a lady bird design, and fail as I did...


Then, arrange them nicely on tray, and steam them over low fire for 10 to 15 minutes. Steaming them over  high heat would ruin the design on Apam. If you're using a steamer like mine, make sure that you cover the lid with a clean towel to prevent the steamed water from dripping down to Apam.


And this is how they looked like when they're done! Don't you think they looked better than the first time I did it? They're a bit fluffy too! 

Apam Polka Dot
(Adapted and Translated from Apampolkadot.com)

275g flour
220g castor sugar
150ml milk or evaporated milk
3 tsp baking powder
3# egg white, cold temperature
3# egg yolk, cold temperature
1 tsp ovalette (cake stabilizer)
1 tsp vanilla essence (I used extract)
Food coloring 

  1. Combine flour and baking powder.
  2. In another bowl, beat egg white until fluffy.
  3. Add in ovalette, egg yolk and vanilla essence. Mix well. Add in sugar.
  4. Add in flour and milk alternately into the batter.
  5. Divide batter into a few portion and add in a few drop of your preferred food coloring. Mix well
  6. Add in batter into a piping bag. Then, pipe the batter into the paper cup until it is 3/4 full.
  7. Grab a piping bag with different color and pipe small dot on top.
  8. Steam for 10 to 15 minutes.
  9. Let it cool before serve. Or keep them into an air tight container to prevent the Apam from harden.

Monday, April 16, 2012

Vanilla Sponge Cake


I made these sponge cake for my parents' anniversary last week. It's been quite some times since I made these sponge cake. The last time I made them, I was still in the culinary school.

Aren't they adorable? And fluffy too...


I made two trays of them and decided to give half of them to family's friends and the save some for my family. The first cake was filled with whipped cream and cocktail fruits and frosted with more whipped cream - and these batch were given away.


The second one was filled with whipped cream and blueberry fillings (my mother likes blueberry), frosted with more whipped cream and topped with shaved chocolate - I save this one for my mom

They're not too sweet kind of treats, which is good as my mother didn't favor sweets much.

Anyway, Happy Anniversary Mom & Dad!

Vanilla Sponge Cake

8 eggs
250g castor sugar
250g soft flour
100ml water
25g ovelette
150g butter, melted
1tsp baking powder
1tbsp vanilla extract

1. Preheat your oven to 180 degrees Celsius.
2. In a bowl, combine all ingredients, except for butter.
3. Beat well in about 3 to 5 minutes.
4. Fold in melted butter into the batter.
5. Pour batter into a pan and bake for 30 minutes.
6. Decorate and serve :)

Monday, March 26, 2012

Chocolate Cake


I made this chocolate cake for someone's birthday last weekend. I opt to coat them with whipped cream to give them a light taste.Then I sprinkled some chocolate chip between the layers, and frosted them with more whipped cream.


Somehow, I managed to make my cake looks cheap than it appear to be. And I really, really, really need to improve my writing skills. (And I forget to dry the maraschino cherries before putting them on cake!! What am I thinking??) I think I like them without any coating and decoration. It looks nicer that way. 

To whoever that received the cake, pardon me for my bad handwriting and cake decoration technique.

Chocolate Cake

250g butter
350g castor sugar
75g cocoa powder
175g cake flour
1tsp baking powder
100ml buttermilk
1 tsp vanilla
3# eggs

1. Preheat the oven to 175 degree Celsius.
2. Sift cocoa powder, cake flour and baking powder in a bowl. Set aside.
3. Beat butter and sugar in another bowl until it's fluffy. Then, add in eggs one by one. Beat in vanilla.
4. Alternately beat in flour mixture and buttermilk into the butter. Mix just until combined.
5. Bake for 35 to 40 minutes or until a toothpick inserted comes out clean.
6. Let it cool and serve. You can have it plain, frosted with whipped cream, chocolate ganache or chocolate butter cream—anyway you like.


They look nice as cupcakes too! :)

Tuesday, February 28, 2012

Chocolate & Vanilla Cake with Strawberry Swiss Meringue Buttercream


Foodies by ai reverts back to pink! How do you like it? The banner was actually drawn by my little sister. I asked her to draw that picture for my blog, and she did. I thought it was quite alright, although she needed to improve more on perspective.

Anyway, I made this Chocolate and Vanilla Cake with Strawberry Swiss Meringue for my brother's birthday. He turned 26 this year! Congratulation!


But, I couldn't decide between Vanilla or Chocolate. So, I made both for him. I thought I wanted to experiment on the checkered cake, once more. 


Yes, I made the checkered cake years ago. It was Vanilla and Chocolate with Coffee butter cream. I remember making them for my parent's anniversary :)


And the good thing about making a checkered cake is that, you'll get two cakes instead of one :) So, I make one for my family, and the other one for my brother to bring them to his office. It's part of my giveaway plan. But, the first cake turned out like this. It doesn't look as appetizing as I'm out of butter cream. And, it was too late to went out to buy more ingredients to make one.


I bought more ingredients and prepare more butter cream the next morning.  And this is how the cake looks like after decorated. I think it looks quite alright. What do you think about it?

Saturday, November 26, 2011

Tiramisu with Strawberries


I LOVE strawberries. So, when I saw Tracie Moo from Bitter Sweet Flavor's Strawberry Tiramisu. (She made her Tiramisu in a wine glass, and it looks AMAZING!) I was tempted to make one. When I was in culinary school, most of my classmate was afraid to prepare this dessert because of it's difficulty. I never really got to try to prepare Tiramisu myself. It's always the other person, or the other group who got to be in charge in preparing this dessert.


I consulted this recipe I got from my pastry class, and decided to challenge myself to prepare this dessert. But, there's one big problem. I couldn't understand my own recipe, since there's no preparation method mentioned. There's only the ingredients needed and numbers of sequence. After a few minutes of staring at my note, I finally figure out the recipe, and my adventure began. 


Tiramisu

2.5 egg yolks (beaten)
60g castor sugar
1/2 tsp vanilla essence
250g mascarpone cheese
40g whipped cream
10g gelatin powder

Ladies finger sponge (24 pieces)
Strong coffee
Strawberries - sliced. Set aside some for garnishing.
Cocoa Powder

Preparation:

1. Beat egg yolks, sugar and vanilla essence in a bowl. Add in cream cheese and continue beating until creamy.
2. Fold in whipped cream, and add in gelatin powder.
3. Pour in coffee in a shallow dish, and dip in ladies finger sponge in strong coffee. Don't dip in the sponge too long in the coffee. 
4. Top the sponge with mascarpone cheese. Sprinkle some fresh strawberries on top. (Tracie Moo from Bitter Sweet Flavor used strawberry filling. But, I like them fresh.)
5. Top strawberries with another layer of coffee dipped sponge and mascarpone cheese. Sprinkle with cocoa powder.
6. Refrigerate for at least two hours.
7. Garnish with more strawberries before serving.

Saturday, October 8, 2011

Order: Chocolate Moist Cake


I made this for my brother's friend. A chocolate moist cake with vanilla frosting, and topped with chocolate glaze. I had fun experimenting with transferring sheet for that chocolate too.

Friday, July 15, 2011

Cake Truffles


I made these from cake scraps. I love cake truffles. They were easy and cute. When I found myself lazy to bake any cake, I would grab some butter cake from the bakery, crumbed them and mixed them with Betty Crocker's vanilla frosting. Shape, dip and sprinkle - and they were good to go. They were really easy. I bought some transfer sheet the other day, and decided to experiment them on the truffles. They look lovely, don't they?

Thursday, June 30, 2011

Birthday Cake


I made this two tiers for Jah's birthday :) Chocolate cake with vanilla frosting on the top, and chocolate cake with chocolate ganache for the bottom part. The cake was covered with vanilla fondant. My work seemed messy. Rolling those fondant make my body ached.

Friday, December 31, 2010

Cheesecake Cups with Chocolate Chips Topping


Happy holidays people! I hope that you'll have a wonderful holidays with your loved ones. It's the end of 2010. So, that will makes this as my last post for 2010.

Anyway, I've been busy trying off recipes and altering old recipes to my liking. A few days ago, I've been altering my cheesecake recipes a bit. I've been using Philadelphia Cream Cheese all these time, and wanted to try using Tatura Cream Cheese. They came out great too! Though using Tatura Cream Cheese,  you'll need to add in a little bit more of sugar. However, ,my mom loves Tatura version more than Philadelphia as it is less cheesy and less sweet.

 Cheesecake Cups with Chocolate Chips Topping

250g cream cheese
100g sugar
2# eggs
10g flour
5gm corn flour
70ml cream
100g chocolate chips

Base:
1 Packet of crushed Oreo's & melted butter


1. Preheat the oven at 130 Celsius.
2. Press the crumb into the bottom of muffin pan. There should be no cracks. Refrigerate
3. Whip cream cheese and sugar until fluffy.
4. Whip in eggs one by one.
5. Mix in the flour.
6. Add in cream and  combined well.
8. Pour the cheese batter into the pan, and sprinkle some chocolate chips on top.
9. Bake using water bath for 30 to 45 minutes or until the cake is set.
10. Remove from oven and place on a wire rack. Let it cool. Then cover with plastic wrap and refrigerate.

Tuesday, October 26, 2010

Easy Sponge Cake


I've always loves to try out new recipes. So, when I found this sponge cake recipe, I thought I'd give it a try (I've forgotten where I've found this recipe though). Well, I had two sponge cake recipes and both of them contains ovalette. This one doesn't. And the recipe requires less ingredients too.

Sponge Cake

100g flour - sift, 3 times
3# eggs
90g castor sugar
20g butter - melted.
2tbsp milk
1tsp vanilla

Method
1. Beat the eggs and sugar on high speed for five minutes. Then, beat them for 2 more minutes on low speed.
2. Fold in the flour until well combined.
3. Fold in melted butter, vanilla, and milk.
4. Bake at 170degrees Celsius for 30 minutes.

Friday, October 15, 2010

Fondant Practicing


Today's Aimi from burp! le festin avec moi birthday. I made her a birthday cake, while practicing my fondant. They were lemon sponge cake with strawberry Swiss meringue buttercream and covered with vanilla fondant. This fondant was definitely hard to roll as compared to the marshmallow fondant. I think my body's begin to sore from rolling them. XD The cake wasn't exactly how I planned the it to look like, but I think it was pretty good too... Maybe I should take a cake decorating class?

Anyway...

Happy Birthday Aimi~

Wednesday, October 13, 2010

Sarawak Layered Cake Charlotte


I made an attempt to prepare Strawberry Charlotte with Swiss Rolls. It didn't looked too good. My bowl wasn't deep enough, and the Swiss Rolls was sliced thickly. The strawberry filling was good, however.


So, when I see those Sarawak Layered Cake in the fridge, I was thinking of making a Charlotte again - using the layer cake. The cake was chocolate layered. I thought chocolate filling would be good!


They definitely looked good compared to my first Charlotte. I was smitten with this one. It wasn't too sweet, but the chocolate filling was really good. Somehow, I feel like I could gain a few kilos from eating this. Yes, it was that good~

The recipe is as below:

Sunday, October 10, 2010

Teddy Cake

Teddy Cake

There is a few stories behind this awkward looking teddy cake. 

First: it was my friend's birthday. I was thinking of giving her a cake as a birthday present. I was thinking of something big.  My friend, Ina lives 20 minutes away from me. You see, last year, I told her that I made her some cakes for her birthday. She then told me she would come to pick up the cake. She wanted to come by with a motorcycle. But then, her mother told her to use the car, thinking that it might be a big cake. When she arrived, I handed her this:

Chocolate Cupcakes

9 pieces of mini chocolate cupcakes! Somehow, I feel like I should give her a bigger cakes this year.

Second: When my cousin visited my house, she gave me this:

A present form my faraway cousin :)

Yes, that teddy cake mould, and a decorating set! My mother and I thought that we should definitely bake some cakes using this mould, and show some picture of the cake to her.

Third: I was thinking of covering the cake with some butter cream. I've seen some picture, and I thought that I should give it a try. Then, I remembered that I told my brother I'm going to make some fondant cake, and post some picture here. I didn't have enough ingredients to make some fondant, so I opt for marshmallow fondant. 

Fourth: I was thinking of making my own marshmallow. So, I put in some sugar, corn syrup, and honey into the pot, and start boiling them. However, I've forgotten about them for a bit, and the syrup hardened in the pot. I have to add in some hot boiling water to get them out.

What on earth is that?

Yes, that thing is the hardened syrup that I managed to scoop out from the pot. It looks like some broken plates. At this point, I was thinking that maybe I should learn sugar molding~

Anyway, I've managed to prepare my marshmallow fondant, and covered the cake.

Teddy Cake without decoration

I was thinking that I wanted to draw the teddy eyes, and write down 'Happy Birthday' using the edible pen marker.

Food Writer

My  mother brought me these to encourage me to bake. However, as I started to write 'H', it didn't came out as I wanted it to be. So, I had to change my plan, and began to make some royal icing.

Final product

And this is how it looks like~ The piping process with royal icing didn't go as smooth as I expected. But hey, this looks pretty okay for a first timer, right? I delivered this cake to my friend yesterday, and she was surprised to see such a big cake! Perhaps she was expecting something small like what I gave her last year XD


Cupcakes with roses

I had some extra cakes batter, and I made them into cupcakes!


P.S/ Thank you Kak Faridah for that teddy cake mould, and the decorating set X)

LinkWithin

Related Posts Plugin for WordPress, Blogger...