Showing posts with label bite size. Show all posts

Monday, February 17, 2014

Fried Gouda


I love cheese. I love dishes with ooey gooey, melt in your mouth cheese dish like grilled cheese or baked pasta with cheese, or lasagna. I haven't had experience with a lot of cheese. In fact, I usually use cheddar, mozzarella, Parmesan, mascarpone and cream cheese. I've never used or taste any cheese other than that. But after watching lots episode of How I Met Your Mother, my sister and I have taken a lot of interest on Gouda, thanks to Marshall Eriksen. Then, my boss gave me a packet of Gouda and advised to grate the cheese on pasta. 


I wasn't that thrilled to use them with pasta. I googled for a few recipes and found some recipe of Beer and Gouda soup. The problem is that, I don't eat or drink anything contains alcohol, and I cannot imagine how Gouda soup will taste like. Then I thought, why don't I just slice the cheese and deep fry them?

So I googled to check whether Gouda is suitable for deep frying and found a recipe on Czech Fried Cheese Recipe - Syr Smazeny and Gouda is suitable for deep frying!


Fried Gouda

1-inch-thick slices of Gouda
Black pepper or any other spices, herbs
Salt to taste
1 cup all-purpose flour
2 large beaten eggs
1/2 cup bread crumbs or panko, or nestum
Oil or shortening for frying
  1. Sprinkle cheese with salt, black pepper and any other spices or herbs you like. Dredge slices in flour, then in beaten egg, and finally in bread crumbs. I didn't have bread crumbs with me, so I used nestum instead.
  2. Fry quickly in hot oil or shortening until golden brown. Sprinkle with pepper or drizzled gochujang on top for a more spicy flavor. Serve immediately.
This fried cheese is best to consume immediately so that you can experience that hot and melting cheese in your mouth. But be careful of the hot ooey gooey melting cheese.

Thursday, March 28, 2013

Baked Apple Rolls


I made these Apple Rolls sometimes ago when I had some extra sugar crust in the  refrigerator. I wanted to make apple pie, but I was too lazy for extra works. With apple pie, I have to flatten the dough, cut them, fit them into the mold and prepare another dough for the topping to cover the pie. I decided to make the apple pie like sardine rolls. Flatten the dough into a rectangle/square, add in the filling and roll. It was the shortcut version of apple pie. 
Baked Apple Rolls

Sugar Crust
500g Flour
250g Butter
2# Egg Yolk
50g Confectioners Sugar

Filling
4# Apples - peeled, cored, diced into brunois
1 cup Brown Sugar
1 cup apple cider
1# Cinnamon Stick
Cinnamon Powder- as desired
1/2 cup Raisins
1/2 cup dried apricots
1/2 cup dried prune
1/2 cup chopped walnuts
50g Butter
5g Corn Starch

Crust
  1. Sift flour and sugar together.
  2. Rub in egg yolk and butter into the flour mixture.
  3. Turn dough onto work surface and divide them into two balls (base and top crust) and flatten them. Cover with plastic wrap and chill for an hour. Take it out 10-15 minutes before use.
Filling
  1. Sweat diced apple with butter, apple cider and cinnamon stick.
  2. Add in dried fruits, walnut, and sprinkle cinnamon powder to your liking.
  3. Sprinkle corn starch, and let the juice thicken.
Assemble
  1. Preheat oven to 180 Celsius.
  2. Roll one pastry on a lightly floured surface into a square/rectangle.
  3. Spoon the apple filling on the pastry into a line.
  4. Roll up swiss-roll style. Seal the edges with beaten egg white.
  5. Place the rolls on a baking tray. Do not cut them into portion yet. The rolls would turn slightly messy if you did.
  6. Brush 1# egg yolk on top of each crust.
  7. Bake for 20 to 30 minutes or until rolls turn golden brown.
  8. Let cool for an hour before cutting them into bite size for serving. I like to keep them in the refrigerator for a night before serving. It was much more easier to cut them when they're chilled.


Monday, June 11, 2012

Profiteroles


It's been a while since I post anything here.

Anyone miss me? :D

I was busy with wedding and all that preparation last few weeks and it's finally over! Frankly, I miss being in the kitchen to cook/bake something. I miss experimenting with food! I made some profiteroles the other day and thought of sharing them with you :)


Profiteroles are small choux pastry with hollow rounds.  Profiteroles are smaller version of cream puff. It is usually split in half and filled with whipped creams, ice cream or pastry cream (I usually filled them with pastry cream. Then, topped with chocolate sauce or dusted with powdered sugar.


Profiteroles

180ml water
115g butter
10g sugar
115g flour
2# eggs
2# egg white
  1. Reheat oven to 220 degrees Celsius.
  2. Bring water, butter and sugar to boil.
  3. Turn off the heat and add in flour all at once.
  4. Cool the dough and transfer into a mixing bowl.
  5. Whisk in eggs one by one. Then, mix in egg white.
  6. Add in dough into piping bag and pipe them onto baking sheet, spacing them a couple of inches apart.
  7. Bake in profiteroles in the oven for 10 minutes at 220 degrees Celsius..
  8. Reduce heat to 190 degrees Celsius and bake until the profiteroles are golden.
  9. Cool them before filling them with desired fillings such as pastry cream, ice cream or whipped cream.
  10. Pour warm chocolate sauce or dust with powder sugar before serving.


Sunday, April 29, 2012

Apam Polka Dot, Plain


Remember the last time I post on Experimenting: Apam Polka Dot? Well, I'm back to experiment with them again this week. While weighing the ingredients, I couldn't help but to be reminded to sponge cake. There were some resemblance of ingredients between them. Could Apam Polka Dot be translated to Steamed Sponge Cup Cake? Nah... I think it's better to call it as Apam Polka Dot.


And making them was quite simple too! First, you prepare the batter and divide them into a few portion. Drop in a few drops of your preferred food coloring and mix them well.


Next, arrange mini paper cups into a plastic mold or small plastic cup (or anything as above). The last time I made this, I arranged them into a mini tarts mold. And it didn't look as pretty as using these small plastic mold. 


Then, add in the batter into a piping bag, and piped the batter into paper cup until it was 3/4 full. Or you could use a teaspoon. But using a piping bag is neater. Then, use another piping bag with different color of batter and pipe small dots on top of batter.


If you're feeling a bit adventurous, you may pipe any other design that you like. For example, flower.


Or cute and weird emoticons like these...


Or perhaps attempt to pipe them into a lady bird design, and fail as I did...


Then, arrange them nicely on tray, and steam them over low fire for 10 to 15 minutes. Steaming them over  high heat would ruin the design on Apam. If you're using a steamer like mine, make sure that you cover the lid with a clean towel to prevent the steamed water from dripping down to Apam.


And this is how they looked like when they're done! Don't you think they looked better than the first time I did it? They're a bit fluffy too! 

Apam Polka Dot
(Adapted and Translated from Apampolkadot.com)

275g flour
220g castor sugar
150ml milk or evaporated milk
3 tsp baking powder
3# egg white, cold temperature
3# egg yolk, cold temperature
1 tsp ovalette (cake stabilizer)
1 tsp vanilla essence (I used extract)
Food coloring 

  1. Combine flour and baking powder.
  2. In another bowl, beat egg white until fluffy.
  3. Add in ovalette, egg yolk and vanilla essence. Mix well. Add in sugar.
  4. Add in flour and milk alternately into the batter.
  5. Divide batter into a few portion and add in a few drop of your preferred food coloring. Mix well
  6. Add in batter into a piping bag. Then, pipe the batter into the paper cup until it is 3/4 full.
  7. Grab a piping bag with different color and pipe small dot on top.
  8. Steam for 10 to 15 minutes.
  9. Let it cool before serve. Or keep them into an air tight container to prevent the Apam from harden.

Sunday, February 5, 2012

Steamed Brownies


The first time I had a steamed brownies was last year during my visit to Bandung, Indonesia. A friend recommended me to try Bandung's steamed brownies. I bought 1kg of them. I gave half of them to a friend as a souvenir and divided the other half to my family members. And it wasn't enough. One portion of Bandung's steamed brownies are not going to satisfy you. You just gotta have more than one portion. That's when I decided to try and make my own steamed brownies. It wasn't as good as the one I bought in Bandung, but, it wasn't that bad either.


Steamed Brownies

200g butter
200g dark chocolate, chopped (don't use cheap chocolate, or it wouldn't taste as good)
200g flour, sieved
4# eggs
150g castor sugar
1/4tsp salt
100g walnut, chopped (optional)

1. Melt butter and chocolate in microwave, and let it cool for a while.
2. Mix eggs and sugar until fluffy.
3. Fold in flour into the egg mixture with a spatula. 
4. Then, add in the melted chocolate into the eggs mixture. Mix well. Fold in walnut.
5. Pour batter into a 10x10 baking tray, and  steam for 15 to 30 minutes, or until the toothpick came out clean.
6. Let the brownies cool, and refrigerated for at least two hours before served.

Sunday, December 11, 2011

Onion Rings


These onion rings were really crispy. I would never thought that I would be able to eat so many onion rings in one serving. I ate half of them as I was frying the other batch to cook in the frying pan too! Yes! It was that good!

I got the recipe from Jeaniemormof2 in allrecipe, and I altered a bit here and there to suit my available ingredients. I didn't have bread crumbs with me when I made these onion rings. So, I made my own bread crumb. I toasted a couple white bread, and grind them in food processor. They turned out to be really good and crispy!

Ingredients

1 onion, sliced into 1/4 inch
1 1/4 cups flour
1 tsp baking powder
1 tsp salt
1 tsp dried/chopped oregano/basil
1 egg
1 cup + 2 tbsp milk
3/4 cup dry bread crumbs
oil for frying

Directions

1. Separate the onion slice into rings, and set aside.
2. In a small bowl, stir together flour, baking powder, salt and herbs (oregano or basil).
3. Dip the onion slice into the flour until they are all coated. set aside.
4. Whisk the egg and milk into the flour mixture using a flour. Dip the floured rings into the batter to coat. Then, place on a wire rack to drain until the batter stop dripping.
5. Spread the bread crumbs on a plate or a shallow dish. Place rings one at a time into the crumb and coat them well. Repeat with remaining rings.
6. Deep fry at the rings at high heat a few minutes or until they turned golden brown. Remove to paper towels to drain.
7. Ready to serve.

Monday, October 17, 2011

Cake Pops: Cats


I made this cake pops for Aimi from burp! le festin avec moi. She's well known as Mama Meow during our diploma and I can't remember why... Maybe it's because she likes cat too much?

It's her birthday, and I decided to make something for her. I browsed through my bakerella's cake pops book, and found a tutorial to make this. Bakerella's cats is a bit different though... I can't follow the tutorial 100% because it's hard to find the sprinkles used.

This one is chocolate cake with cream cheese filling. Coated with chocolate. I used mini chocolate chips for the ear, some sprinkle for eyes and nose and chocolate rice for the mustache.

It's a bit awkward, don't you think?

Sunday, January 16, 2011

Experimenting: Macaron 2


This is my second attempt to make macarons. Well, if you remember, the last time I make macaron, it didn't have the smooth shell, and they were a bit burnt. I was glad that my second attempts turned out a little better, though I could improve more in making this cute little cookies. Anyway, I was wondering if there's any recipe with less sugar in them. Most of my family members thought that these cookies are too sweet for them.

Tuesday, January 4, 2011

Sushi Fun


My family brought me a sushi set for me a few years ago for my birthday. I've never used the equipments, and they've been asking me when will I be making them some sushi. So, last Sunday, we were having some making some Makizushi.


My brother wanted to try rolling them too, and was given the chance to roll some Kani Kama Maki (imitation crab meat roll) and Tamago Maki (egg roll). My little sister wanted to try too, but I didn't cook enough rice for her to try them.


I added in some Kimchi, in my Maki Roll. So, they should be called Kimbap instead, right? Maybe we could learn another types of sushi as well. I know I've been wanting to use that rice mold I've bought a few months ago. Maybe I could make my first bento too? :D

Wednesday, December 1, 2010

Berliner


I had a craving for doughnut. I always loved Dunkin' Donuts' munchkin. They're so cute. However, when I googled for munchkin recipes, I found Berliner instead. According to German Food Guide, Berliner is accredited to Berlin. They are fist-sized pastries, made from a sweet yeast-dough and deep fried. They are filled with jam or vanilla cream and topped with powdered sugar, granulated sugar or icing.

Berliner looks like  munchkin, although I'm not sure if they're the same. They do looked as cute as munchkin, though. So, I thought, I should be experimenting on this recipe. After all the ingredients required is all available in the kitchen. What I love about Berliner (beside being cute) is the faint sweetness of jelly and dough. It seems like one piece of them is never enough (I caught my cousin eating them again and again).

However, I had a little incident while experimenting this recipe. I made a mistakes while writing down the recipe - so I end up using too much butter in this one. I think my Berliner end up crispier than it should be.

You could find the recipe for Berliner here :)


Friday, November 12, 2010

Chocolate Truffles


My younger brother came back home last weekend. He told me to make something for him to bring back to his college. Well, it was 4 hours and less until he had to go back to college. I haven't got the time to plan anything. Then, I remembered that I still have some chocolates and cream left from my Oat Truffle. So, I made him some Chocolate Truffle instead. I had some melted chocolate left, so I made him some Almond T'ings too :)

Chocolate Truffle
125g Dark Chocolate
100ml Cream
2 tbsp Corn Syrup
10g Butter
250g Melted Compound Chocolate - for dipping
200g Cocoa Powder - sifted


1. Chop dark chocolate into a small pieces.

2. Combine cream with corn syrup in a sauce pot. Bring them to boil, and stir constantly.

3. Pour the cream to the dark chocolate, and stir them well. Then, stir in the butter.

4. Set aside ganache in the refrigerator for an hour, or until ganache is firm to work with.

5. Rest ganache at room temperature for 5 minutes.

6. Line a sheet pan with parchment paper. Using a teaspoon, scoop out balls of ganache and place on the sheet pan.

7. Roll the ganache into a round ball.

8. Dip the ball into the melted compound chocolate.

9. Roll them with cocoa powder. Leave the ball on the cocoa powder until set before remove.

Friday, November 5, 2010

Chocolate Oat Truffles


I brought myself a chocolate bar mold the other day. I was thinking of practicing my chocolate tampering technique, but the chocolate end up looking bad. It wasn't as smooth. So, I melted those chocolate again, thinking that I should turn them into something else. When I look around the kitchen for ingredients, I found a packet of Quaker Oats', and decide to make something based on Chocolate and Oats. I peeked into the fridge, and found enough ingredients to make some Chocolate Oat Truffles. 


Chocolate Oat Truffle


120g Dark Chocolate - melted
80ml Cream
1 tsp Light Corn Syrup
1 tbsp Butter, soft
1 cup Oats
25 ml Milk - warm
1 tsp Vanilla
1/2 cup Almond - toasted and chopped (optional)
1/2 cup Cornflakes (optional)
Garnish:
250g  Compounded Chocolate - melted
2 tbsp Cocoa Powder - sifted.


1. Soak oats, almond and cornflakes with milk and vanilla. Set aside.

2. Combine the melted chocolate with cream and light corn syrup. Then, stir in the butter.

3. Stir in soaked oats with chocolate mixture. Mix until well combined.

4. Spread the chocolate-oat mixture on a parchment paper, and refrigerate them for an hour.

5. Cut the chocolate oat into square and roll in hands to form a ball.

6. Dip the chocolate ball into melted compounded chocolate, and immediately roll them in the cocoa powder until the truffle is fully covered. Let the chocolate set before moving them from the cocoa powder.


Notes: The cornflakes, when soaked with milk and oats will give the truffle a chewy texture.

Sunday, October 31, 2010

Pai Tee (Top Hats) with Sauce


Pai Tee would taste really good with fillings and the sweet sauce. Since I already have my Pai Tee skins (You could keep your skins in an air tight container so they would stay crispy), it's time to prepare the fillings and sauce. Pai Tee fillings would usually consist of carrots, jicama, tofu, bean sprout, mushroom, shrimp or chicken. You could use any of the ingredients based on your taste preference. 

Pai Tee Filling
1.5kg carrot - cut julienne
200g shrimp - chopped
2 tbsp chopped garlic
50g bean sprout
50 ml chicken stock

1. Heat a skillet over a medium fire.
2. Stir garlic with oil until golden. Add in carrot and chopped shrimp.
3. Add in chicken stock and let it simmer and reduce for two minutes. Then, stir  in bean sprout.
4. Season to taste.
5. Add in the fillings into the case. Top with Pai Tee chili sauce, and garnish with chopped spring onion, or sliced cherry tomato.
Pai Tee Sauce

6# red chilies.
1 inch ginger
4-5 clove garlic
1/2 tbsp salt
1 tbsp vinegar
2tbsp salt

1. Blend red chillies with ginger and garlic.
2. Cook the blended ingredients with sugar, vinegar and salt over medium heat.

Saturday, October 30, 2010

Pai Tee (Top Hats) Skin


My mother been saying that I haven't made Pai Tee for a while. Pai Tee is a delicious dish crispy shell shaped like top hat, with usually savory ingredients inside. They makes great hors d'ourves. These days I've seen variations of Pai Tee. Some of them used salads to stuff in the shell. Making Pai Tee, however was quite tricky. The frying process is quite time consuming. The recipe I've always had requires some flour, and corn flour. My mother thought that the shell isn't that good. I browse on the internet and noticed that many were using the combination of flour and corn flour. So, I combined those two  recipe for a tryout.

Pai Tee Skin

100g flour
1tbsp rice flour
2tbsp corn flour
1# egg
180ml water/milk
salt


1. Heat the pot over medium fire. You need a deep pot with plenty of oil for deep frying. Make sure the Pai Tee mold could be covered in oil while frying.

2. Mix well all ingredients in a bowl.

3. Heat your mold in the oil for 2 minutes.

4. Dip the mold into the batter, make sure that the batter cover the sides of mold and the batter isn't too thick.

5. Slowly dip the batter coated mold into the hot oil. The Pai Tee skin will separate itself from the mold. If it didn't separate, you may use a toothpick to separate them.

6. Fry them for a bit more until they're golden.

Tuesday, October 19, 2010

Almond and Dates T'ings


T'ings are one of the simplest things in chocolate making. There's no measurement, and the ingredients are really simple. All you need are milk, dark or white chocolate, tempered or compounded and some nuts and dried fruits for toppings. You could even use your leftover chocolate from finishing other chocolate to make T'ings.

I made this using the leftover chocolate from dipping some cake truffle. I used chopped almonds and dates for toppings as they're the only nuts and dried fruits I could find in the kitchen. Of course, you could try making them with other toppings too. Just spoon your melted chocolate in bite-size pools, and add on the desired toppings.

Monday, October 4, 2010

Double Pops!

Lovely Cake Pops and Blue Monster Cake Pops. Which one did you like the best?

I bought a packet of Oreo a few days ago. I saw this Oreo truffles on Bakerella sometimes ago, and I thought of making them today. This was the easiest version of pops and truffles. All you need is a packet of Oreo cookies, 125g of frosting (I like cream cheese frosting) and some chocolate or candy melts for coating.

Oreo truffles on board, ready for the dipping process

First, finely crush those cookies in a food processor. Add in the cream cheese and combine them well. Roll them into a ball and set aside. Melt the chocolate or candy melt, and start dipping! Set them aside on a cookie sheet to dry. Sprinkle them with your favorite sprinkles! How simple is that?

I think this one will look pretty for a wedding too~

I made some white Oreo pops using white chocolate (Candy melts is a little bit expensive in my country). I seems to always fail in melting them. Seriously, how do I melt them right? Then, I attached the jumbo red heart sprinkle, and drizzle them with some strawberry flavored chocolate (Thank god the strawberry flavored was easier to work with).

Oh~ an angry monster on the left!

I intended to make some blue colored cake pops. So I added in some blue coloring into the white chocolate. However, I accidentally add in too much, making it much more harder to work with. I don't want to waste any of them, so I coated the pops, took a toothpick, and start drizzling and dabbing the pops with the blue colored chocolate (head over to bakerella to learn how to drizzle and dab them). Now, nobody is going to notice that I'm suck at coating with white chocolate XD

Nezumi


My brother brought back this cute little nezumi (mice) shaped cake. He told me that his friend went to Japan, and brought back this cake as souvenir. So, I grab my camera, and snapped some picture of the cake before popping them into my mouth. It melted. The cake wasn't so sweet and they melted in my mouth.It tasted good and interesting. I wonder what are they made of?

Monday, September 27, 2010

Cake Truffle

cake ball
White, chocolate and purple coated cake truffle~

Aimi from burp! le feastin avec moi told me a few times that she wanted to taste my cake pops. I never really had the chance to give her any sample as we rarely met (although we didn't live that far apart). So, I made a few cake truffle/cake ball for her and our guest during my open house last Sunday. I am really glad that our guest loved it!


 I love drizzling them! It was super fun!

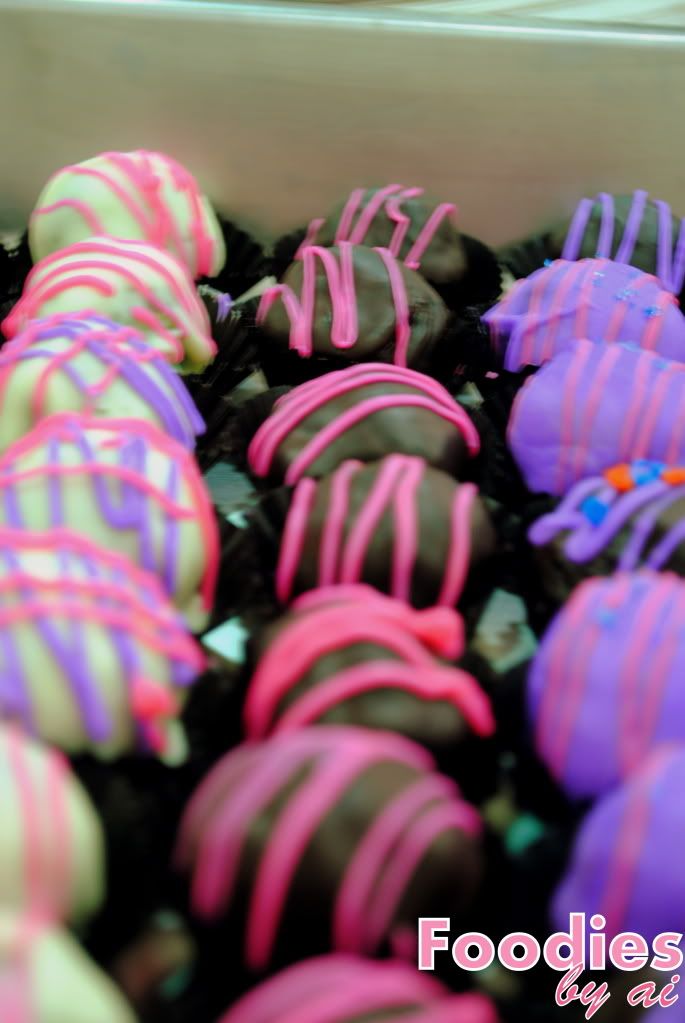
I made vanilla and velvet cake. Than, they were coated in white, purple, pink, and dark chocolate (I add in some coloring in the white chocolate to get the purple color). For the final touch, they were drizzled with pink and purple chocolate.

Pretty, aren't they?

Friday, September 17, 2010

Mini Pizza


My brother said that he had a project for me. He wanted me to make something for giveaway to our neighbors. He didn't want anything sweet like cupcakes as most of our neighbors is elderly (and of course, most men didn't like to eat sweet stuff). So, I suggest that I could make him some mini pizza.


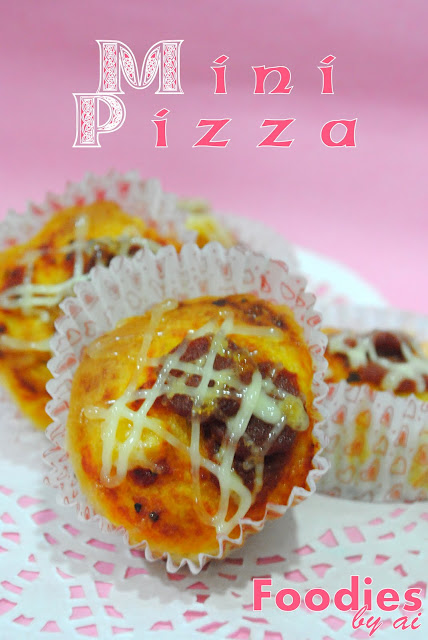
I made the dough using the same recipe I used for my Focaccia Pizza. Each of the dough in the paper cup weight about 9 to 11 grams. Then, I spread some tomato basil paste on top of those mini pizza, and sprinkle some sausages and mixed vegetables. Next, I piped some mayonnaise on top of the toppings (It was really fun piping those mayonnaise!) 


Bake them at 200 degrees Celsius for 20 minutes, and it's all done!  I love this mini pizza. Well, it's cute, the cost is much cheaper than making cupcakes, and it's in bite size! It's perfect for giveaways!

Friday, July 23, 2010

Cabbage Wrap with Kimchi Paste

Cabbage Wrap and White Radishes with Kimchi Paste

I need to go on a diet. After a few months lazying around the house, I noticed that I've put up some weight. Then, my mother mentioned that my dad wanted to go on a diet too, and she needs to think of some menu for dieting. I thought that Cabbage Wrap is a good menu for dieting, and went around looking for the recipes.


However, I thought that the Cabbage Wrap looked somewhat plain. It needed some sort of dipping sauce, or gravy. I was thinking of something spicy, and remembered that cabbage would taste great in kimchi, and started to Google for some kimchi paste recipe on the internet.


The Cabbage Wrap with Kimchi Paste taste really good!! I thought that the kimchi paste was too spicy for my preferences, but after a while, I get addicted to the taste. I'm going to keep the recipe and try them again for sure!

Recipe:

2 medium size Chinese Cabbage
400g Ground Beef
1 Medium Carrot - diced/chopped
1 large Onion - chopped
1 clove garlic - chopped
Salt and Pepper

Kimchi Paste (Click for recipe)


Direction:

1. Combine ground beef with chopped carrot, garlic and onion. Season with salt and pepper.
2. Preheat oven to 180ºC.
3. Boil a large pot of water on stove, and sprinkle some salt.
4. Pull the cabbage leaf off the head carefully. Blanch the leaves a few minutes until they're tender. Dry the blanched cabbage on the chopping board.
5. Take the ground beef mixture and place on the edge of the leave. Roll the leaf. Make sure that the beef mixture is fully covered.
6. Arrange the wrapped cabbage into a casserole bowl and pour the kimchi paste on top of the cabbage.
7. Put the dish on the oven, and bake for 10 minutes at 180ºC.

Chinese Cabbage on Foodista


LinkWithin

Related Posts Plugin for WordPress, Blogger...